What is covered?
- Overview
- Installing python in windows sub-system (Ubuntu 16.04)
- Installing Apache spark in windows sub-system (Ubuntu 16.04)
- Master/Slave configuration
- Start spark cluster
- Stop spark cluster
- Test the cluster setup
Overview
Windows 10 offers an application to install sub-operating-system known as the windows sub-system (WSL). To install windows sub-system you can follow the tutorial here. You can download Apache spark from here. I am using Ubuntu 16.04 (highly recommended because it is most stable version and I didn’t find any compatibility issues) that comes with python 3.5.2 versions which you can check by following command.
python3 -VBy default spark comes with python 2, however for distributed deep learning development I prefer to use python version as 3.6.x (because of the compatibility issues of other libraries). You can choose any python version you want. So, we also need to install required python version in sub-system and link it with spark. Please make sure that each of the nodes (master and slave) are running on same version of python or else you will get errors.
Installing python
You can follow along the below steps to install the python in your ubuntu 16.04 windows sub-system.
sudo apt-get updatesudo apt-get install libreadline-gplv2-dev libncursesw5-dev libssl-dev libsqlite3-dev tk-dev libgdbm-dev libc6-dev libbz2-dev build-essential zlib1g-devwget https://www.python.org/ftp/python/3.6.9/Python-3.6.9.tgztar -xvf Python-3.6.9.tgzsudo rm Python-3.6.9.tgzcd Python-3.6.9./configureIf there are no errors, run the following commands to complete the installation process of Python 3.6.9
sudo make sudo make installTo test the installation run the following command and it should show python version as 3.6.9.
python3 -VInstalling Apache spark
The following setup is required to be performed in all master and slave nodes.
Install Java
Download Java from here
Move the java tar file to /usr/ directory.
sudo mv /YOUR_DOWNLOAD_PATH /usr/Navigate to the usr directory.
cd /usr/Extract the java tar file.
sudo tar zxvf jdk-8u291-linux-aarch64.tar.gzRename the extracted folder to java.
sudo mv jdk-8u291-linux-aarch64 javaRemove the java tar file.
sudo rm jdk-8u291-linux-aarch64.tar.gzAdd the Java path in the /etc/profile file as follows:
sudo nano /etc/profilePress Control + C and use arrow keys to navigate to end of the file
JAVA_HOME=/usr/java
PATH=$PATH:$HOME/bin:$JAVA_HOME/bin
export JAVA_HOME
export PATH
Press Control + X and Y and then Enter to save the file. To reload the environment path execute following command:
. /etc/profileTo test the installation run the following command and it should show java version:
java -versionInstall Scala
sudo apt-get install scalaTo check if scala is installed, run the following command:
scala -versionInstall Spark
sudo wget https://apachemirror.wuchna.com/spark/spark-3.1.1/spark-3.1.1-bin-hadoop2.7.tgzsudo tar zxvf spark-3.1.1-bin-hadoop2.7.tgzsudo mv spark-3.1.1-bin-hadoop2.7 /usr/spark/sudo chmod -R a+rwX /usr/sparkSet up the environment for Spark.
sudo nano /etc/profileEdit the last line (export PATH) as follows:
export PATH = $PATH:/usr/spark/bin. /etc/profileTo test the installed spark execute the following command:
spark-shellThe whole spark installation procedure must be done in master as well as in all slaves.
This completes our base installation. Now we can move to configure master and slave nodes.
Master/Slave configuration
Add IP addresses of the master and slave nodes in hosts files of all the nodes. (master and slaves)
sudo nano /etc/hostsNow add entries of master and slaves in hosts file. The names (masterslave1 and masterslave2) can be anything. These names are given for ease in remembering. You can add as many IP addresses as you like.
<IP-Address1> masterslave1
<IP-Address2> masterslave2
...
Spark master configuration
Edit spark environment file. Move to spark conf folder and create a copy of template of spark-env.sh and rename it.
cd /usr/spark/confsudo cp spark-env.sh.template spark-env.shsudo nano spark-env.shAdd the following lines at the end of the file and save it:
export SPARK_MASTER_HOST=<MASTER-IP>
export PYTHONPATH=/usr/local/lib/python3.6:$PYTHONPATH
export PYSPARK_DRIVER_PYTHON=python3.6
export PYSPARK_PYTHON=python3.6
Add worker nodes in master node
sudo cp workers.template workerssudo nano workersRemove the localhost. Add the slave nodes in the following format. You can add as many slave nodes as possible. You can also create a single master and slave node by giving same IP address as master.
<slave_username>@masterslave1or
<slave_username>@<IP-Address1>You can also verify the connectivity of slave nodes with master node by using ssh command as follows:
ssh <slave_username>@masterslave1It should now ask for password of the slave node, once entered you will be logged in.
If you received an error for connecting with the slave node (ssh: connect to host masterslave port 22: Connection refused), then you can reinstall the ssh as follows and it will work.
sudo apt remove openssh-serversudo apt install openssh-serversudo service ssh startNow run the ssh command again to login the slave node. Once done then we move to start the cluster.
Start spark cluster
To start the spark cluster, run the following command on master:
sudo bash /usr/spark/sbin/start-all.shNow it should ask for the slave’s password and then your spark cluster setup should run successfully.
If you receive an error: Permission denied (publickey), then do the following and run the above command again
sudo nano /etc/ssh/sshd_configUpdate the following values:
PermitRootLogin prohibit-password to PermitRootLogin yes
PasswordAuthentication no to PasswordAuthentication yes
Restart the ssh services
sudo service ssh restartAfter this, your error will be resolved and you can run start-all.sh command again.
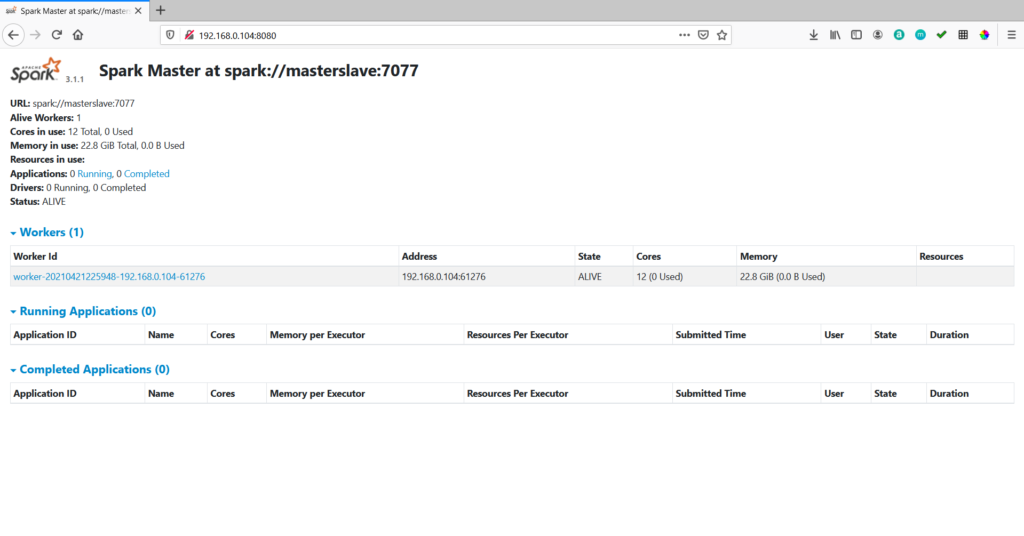
You can view the running spark cluster in this URL: http://<Master_IP>:8080/

Stop spark cluster
To stop the spark cluster, run the following command on master:
sudo bash /usr/spark/sbin/stop-all.shTest the cluster setup
Below is the sample python program to run on spark cluster. Update the MASTER_IP and save this file as test.py
from pyspark import SparkContext, SparkConf

master_url = "spark://<MASTER_IP>:7077"

conf = SparkConf()
conf.setAppName("Hello Spark")
conf.setMaster(master_url)
sc = SparkContext(conf = conf)

list = range(10000)
rdd = sc.parallelize(list, 4)
even = rdd.filter(lambda x: x % 2 == 0)
print(even.take(5))
Once your cluster is up, you can enter below commands to execute test.py file.
sudo bash /usr/spark/bin/spark-submit --master spark://<MASTER_IP>:7077 test.pyYou will see bunch of INFO statements in your WSL terminal along with the output of your program as shown below:

You can also view the status of your job at the master URL: http://<Master_IP>:8080/

